|
KEVIN'S SONEX AIRCRAFT PROJECT

The Sonex is a modern two-seat homebuilt aerobatic aircraft designed for the experimental light-sport category.
| stall | cruise | vne | climb @ aero | fuel | range | empty | gross @ util | limit loads |
| 35 kts | 148 kts | 170 kts | 2000+ fpm | 60lt / 42kg | 345 nm | 280 kg | 520 kg | +6/-3G
@ 950lbs/430kg |
| 40 mph | 170 mph | 197 mph | | 16gal / 92lbs | 400 mi | 620 lbs | 1150 lbs |
| 65 kmh | 270 kmh | 320 kmh | 10+ m/s |
| 640 km | | |
Sonex Aircraft website |
Other builder's websites |
SonexTalk email group
| Site Map
PROJECT STATUS: February 2012 (still 884 hours...)
|
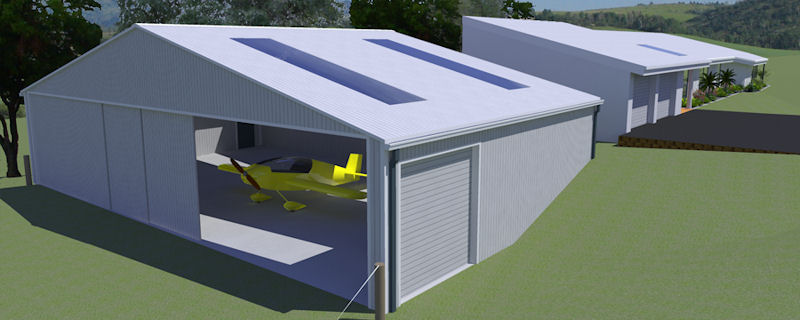
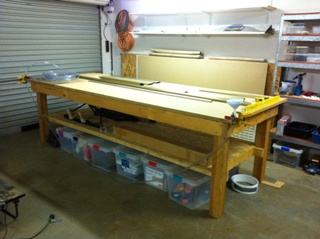
Not a lot of work on the Sonex in the last 8
months I'm afraid, but some small progress towards a workshop /
hangar. There was a LOT of discussion about what it should look
like, what it should be made of, where it should be cited, how
it should be oriented etc. etc...! We had a lot of trouble
imagining what it would look like next to the house, so
eventually I had a number of sketchup models created (I can
recommend Joe Malone for
this type of work), which led us to decide on something like
this:
|
PROJECT STATUS: June 2011 (884 hours)
|
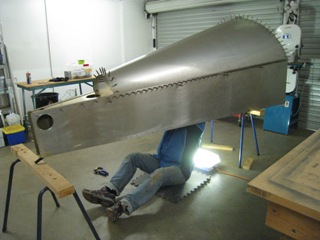
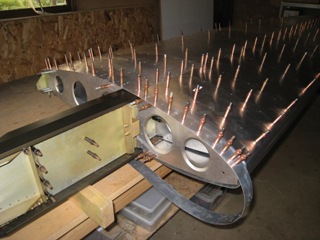
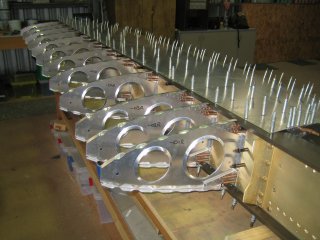
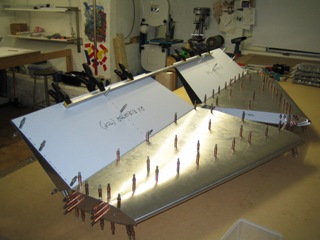
May/June saw the aft fuse box come together
fairly quickly, as I had already finished most of the parts
before the last move, back in May 2009 (!!). I just had a few
holes to cut in the side skins, install the rudder cable guides,
do some tidy-up and then work out all over again how everything
fits together! In my rush to get things finished
and packed before moving, I made a mistake in 2009 by drilling
all the upper longeron holes to final size (#30). They should
stay at pilot size (#40) until the turtledeck has been fitted,
so I had to be extra careful when drilling the turtledeck to the
longerons, not to enlarge the existing final-size holes. I got
away with it, but it highlighted the need to carefully look
ahead in the plans and understand the next few steps ahead of
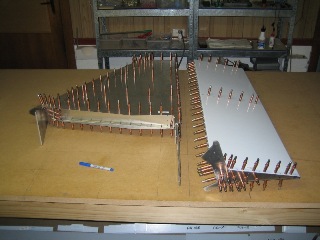
time. After a lot of stomach crunching exercises
fitting the turtledeck formers I eventually got everything
fitted and drilled and clecoed. I've now taken the turtledeck
assembly off again for deburring and corrosion proofing. July
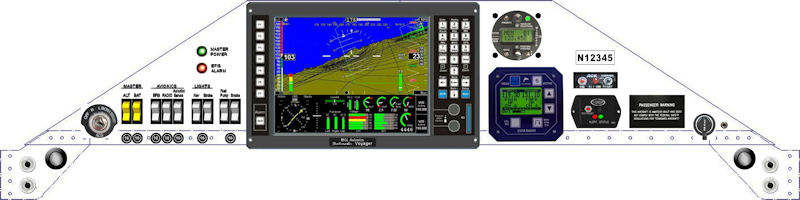
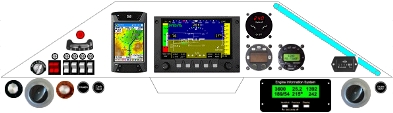
should see it back in place with rivets. Latest
panel concept with MGL Voyager, VHF & Trig Transponder. Although
I'm hoping to use the MGL transponder if it is ready:
 |
 |
PROJECT STATUS: May 2011 (832 hours)
|
It seems impossible, but the last entry in my
builders log
is dated October 2009 - a year and a half ago! Time flies, as
they say. The thing is, I want my Sonex to fly too, so I had
better get back on with it! It has been something of a financial
stretch for us to buy this property with airstrip-in-potentia,
and so the intervening time has been spent... well, stretching!
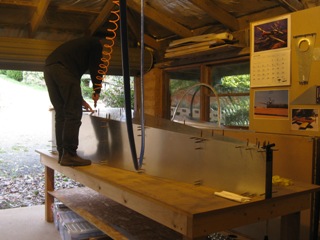
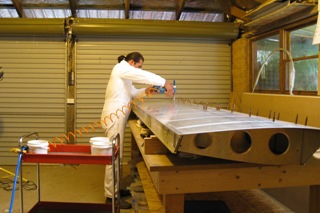
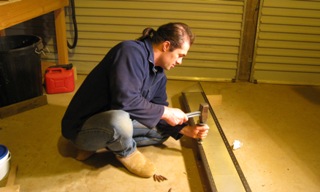
:-) But things are getting back on track again,
and I've just finished setting up my workshop again (for the 4th
time would you believe, after 3 moves in the last 5 years!). Due
to aforementioned stretch the planned hangar & workshop has not
yet been possible, so I've set-up in the garage for the time
being. Picture at right shows levelling the workbench with a
plastic tube filled with water. Next steps will
be to reassemble and rivet the aft-fuse box and construct the
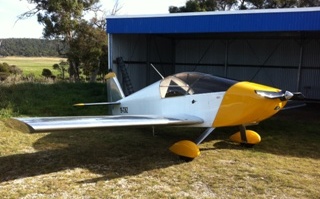
turtle-deck. Then on to the forward-fuse... A
timely inspiration boost has come from getting to have a fly in
Tim Midgley's Sonex, pictured at right. Thanks Tim - Awesome! It
flies beautifully, although is more pitch sensitive than I am
used to. It also reaffirmed my decision to use the Jabiru 3300
engine and the Prince prop. This was the first completed Sonex I
have seen 'in the flesh', and I also have to say that I was
slightly surprised by how small it seems in the real life. In
fact, while we were pushing it back to the hangar I had a
momentary impression that it was not unlike a large-scale
radio-controlled model!
|
 |
PROJECT STATUS: March 2010 (832 hours)
|
Well the 'minor home renovations' I mentioned in
May somehow evolved into a year-long effort culminating in the
purchase of a new property! So there has basically been zero
progress on the Sonex for the last 10 months. I did get the aft
fuse parts alodined, but that's about it. The Sonex is
partially responsible for this latest move actually, as I wanted
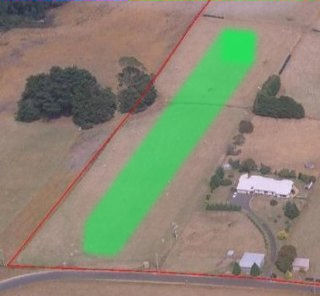
somewhere I could build a Sonex-suitable airstrip. It was not
easy to find! But - our new property has an area that I think
will work. It's only about 300m/1000' and is on a bit of a
slope, so one-way, but it should be fine for the Sonex in most
conditions that I will be flying (read as: good weather!).
It will probably take the best part of another year before I get
back to work on the Sonex, as I want to build a proper
hangar/workshop here, directly off the left end of the house,
opening into the 'airstrip paddock'.There are also plans for
some horse yards and stables and a few other miscellaneous jobs
to do before that. So I'm thinking of this time as a 'long term
investment' in the Sonex! I'll add another section for 'hangar
construction' when it gets underway... |
 |
PROJECT STATUS: May 2009
|
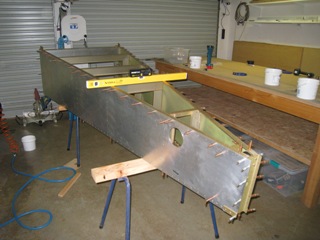
The aft fuselage box is well on the way. I had
hoped to have it finished and riveted, complete with turtledeck
by the end of the month, but it'll probably take until next
month now. I haven't riveted anything yet as I need to
disassemble for alodining and priming prior to final assembly.
Some minor home renovations and replacing all the guttering on
our house is slowing the Sonex down a little, but I am informed
that preventing it raining in the kitchen whenever it rains
outside has a higher priority! Unbelievable, I know... ;-)
I'll get some pictures loaded into the fuse construction pages
soon... |
 |
PROJECT STATUS: April 2009
|
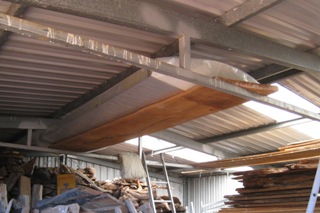
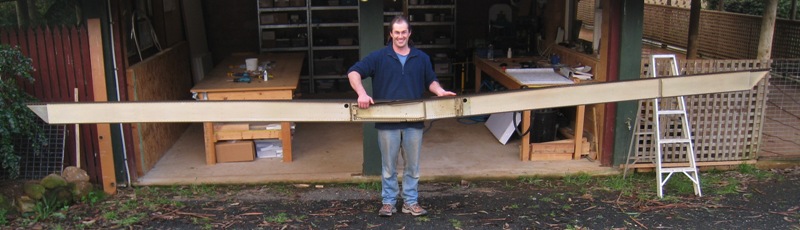
Well it took a few extra weeks to get around to
it (we went on a short holiday in Fiji) but I finally got the left
wing-tip on today! So the left wing is now done, wrapped in
plastic and stored up in the top shed with it's mate.
I now have the wings, tail and all control surfaces completed,
so the only major part of the airframe left to build is... the
FUSELAGE! I sure hope it's true what they say about the
fuse being much easier and faster to build than the wings... :-) I've started
organising all the parts to make the aft fuselage section.
I cut most of the channel parts to length back when I first got
the kit in 2005, but they now need to be completed, along with
some small parts that go together to make the aft fuse sides. |
 |
PROJECT STATUS: February 2009
|
My 2009 goals are going well so far:
Sonex right wing is finished and installed for now up in the
wood shed roof frames, awaiting a mate and a fuselage. Left wing
has the frame riveted and now only requires some wiring and
final skin installation to be complete. Should be done with it
and started on the fuselage by the end of March.
My weight is down from 85kg to 78kg, so only 3kg to go.
Sojo & I completed our first 40km endurance
'training' ride on Feb-28 with a perfect vet through at the end.
Another 40 and then three 80km rides to go before he's
qualified.
|
 |
|
I've also been playing around with
Xpanel and have a
new panel layout. I
bought an OKI C5650 colour printer last year, which can print
out Sonex size panels at full scale onto a single 216x900mm
sheet of banner paper. I've moved the Voyager left of centre to
try and minimised crossing of arms (right hand on centre-stick,
left hand pushing buttons).
 |
PROJECT STATUS: January 2009 (675 hours)
|
Well, I seem to have well and truly overshot my
2005 New Year Resolution to build a Sonex by the end of that
year... ahem! But, I'm now very close to having the wings
finished and am going to renew my new year resolution for 2009 -
I will have the airframe finished and the engine in my workshop
by this time next year. My other major goal for
2009 is to qualify my 5 year old Quarab "Sojo" to compete in
endurance rides. And get my weight from 85kg back down to 75kg.
I think both Sojo & the Sonex will appreciate that one! In the meantime,
I've begun riveting the right aft wing skins on! The right wing
should be well finished by the end of January. |
 |
PROJECT STATUS: October 2008 (603 hours)
|
I've now Alodined all the wing ribs,
gussets and aileron bellcrank parts. Currently riveting the
gussets to the ribs and making the #9 rib aileron bellcrank
assembly. Next will be riveting the ribs to the
right-spar, adding wiring conduit, static/pitot/aoa lines and
wing tank plumping... |
PROJECT STATUS: September 2008 (583 hours)
|
Have been deburring wing ribs and associated
parts. Nearly ready to alodine all the wing parts prior to
reassembly and final riveting. I've also uploaded a lot of new
pictures to the construction area and am in the process of
adding comments to all pictures. |
PROJECT STATUS: July 2008 (573 hours)
Wing spars riveted and mated!
I found that a 1/2" diameter bolt seemed to set rivets better
than the 3/4" bolt, and I also stopped using the 5/32" squeezer
set, sitting the head of the rivet directly on the bucking-bar.
The head gets flattened slightly, but I think it actually looks
better, and the Sonex literature says it has no affect on the
strength. |
PROJECT STATUS: June 2008 (563 hours)
|
After getting the left wing clecoed together and
all holes drilled to final sizes, it's finally time to set all
those solid rivets in the main spar assemblies.
Despite earlier thoughts of using a c-frame tool for this, I
decided to try the Sonex suggested 'hammer and bolt' method,
which so far is proving quite satisfactory. I started at the
outboard end of the spar, thinking that my 'hammer' technique
would improve as I went and the outboard rivets would be less
critical (under least stress). I drilled a hole
in the bucking-bar to fit a
5/32" rivet-squeezer set and then
'back-riveted' the rivet tails with a polished 6" x 3/4" bolt. |
 |
PROJECT STATUS: May 2008 (558 hours)
It's taken a while to get
back into building after moving from King Island back to Tasmania,
but I've now started working on the left wing. I'll get it to
the same stage as the right wing (skins clecoed on) and then
take it apart and rivet both left and right main spars before
reassembling the wings for the final (I hope!) time.
I wasn't happy with the fit of the leading edge on the right
wing, and so I tried reforming the left skin by the 'vacuum
bagging' method, with 43mm (1.7") OD PVC pipe forming the
leading edge. It helped, but not as much as I had
hoped - the leading edge radius still seems too large. I'm going
to try reforming it again using smaller diameter pipe. |
 |
PROJECT STATUS: November 2007 (513 hours)
Horizontal stab, elevators,
vertical stab, rudder, flaps and ailerons are completed.
Rear wing spars are completed. Main wing spars are completed
except for final riveting. All ribs have been fitted and
drilled, but require clean-up, alodine and riveting.
I've changed my mind again and have decided to build the wings
before the fuselage. I'm currently working mainly on the
right wing. I'm planning to seal up the first few wing-bays in the leading edge
of each wing, to form auxiliary fuel
tanks. These should add another 45+ litres of reserve capacity
for the occasional 'long haul' over Bass Strait.
I will be leaving King Island and moving back to Tassie in
January, so I will probably won't get much more done until
February or so, apart from packing everything into a shipping
container (again!). |
 |
PROJECT STATUS: February 2007 (260 hours)
Time for a well overdue website
update! I have now moved to King Island, and after quite a break
am starting to work on the Sonex again. It was quite a packing
job, getting it here! I'm now building in the KI aeroclub
hangar, which means I have a lot more room, but on the other
hand it's not quite as close as it used to be when it was just
'downstairs'. I have returned to working on the
tail section, and have alodined all the sub-structure pieces and
begun to rivet things together. Now that I have more space, I am
planning to build the fuselage before going further with the
wings. I've also ticked off a milestone by
getting my Private Pilot Licence (PPL) and RAA Pilot Certificate
in December. My next goal is a tailwheel endorsement for both GA
and RAA aircraft. |
 |
PROJECT STATUS: July 2006 (211 hours)
Still no more progress since April, unfortunately. But, there are
big changes afoot! I am planning to move back to my childhood home
of King Island for a year or so. I am going to take my Sonex project
with me and set up shop in the aeroclub hangar at the airport. I
plan to have a lot more spare time over the next year, and should be
able to spend a lot of time working on the Sonex. I'm slightly
worried about the salty air and relatively corrosive environment on
the island, but I'll use that as encouragement to get parts made,
primed, assembled and painted as quickly as possible!
I hope to make the move around September/October. The only progress
I'll make on the Sonex before then is to pack it all up again, ready
for shipping! Luckily I kept most of the crate material that it was
shipped to Australia in.
So... new construction goal is to have the wings finished by the end
of the year, complete with auxiliary fuel tanks.
Another goal is to (finally!) get around to finishing my Private
Pilot's Licence (PPL) and to also get my
RAA Pilot Certificate along the
way. The RAA license is required to fly RAA registered ultralight
aircraft in Australia. PROJECT STATUS: May 2006 (211
hours)
Yep, well, not a lot is going to happen with the Sonex this month, as I'm now in Boise,
Idaho, in the US for a few weeks. Life is looking pretty busy for the rest of the year
in fact! I'm going to have to be very conscientious in keeping up the Sonex hours when I
get back home. Anyway, there should be more to see by the end of June. Finishing the
wings in July sounds like a good target. PROJECT STATUS: April 2006 (201
hours)
Wing spars are almost ready for riveting. I was waiting on some dimpling and
countersinking bits from Avery in the US for a while, so used that time to mostly build
the flaps. Looks like I may be away most of next month for work, so not expecting to get
a lot done in May. Will have to pull my finger out when I get back! But I still feel
like I'm on track to have it finished by the end of next year. Hopefully...!!
PROJECT STATUS: March 2006 (138 hours)
Unfortunately I've been a bit busy with other stuff and haven't done any work on the Sonex for a couple of months.
But anyway, I've just started on it again,
initially deburring and smoothing the tail parts prior to alodining and riveting, but have put that aside for the time being and have now started on the main wing spars.
The picture on the right shows both main spars temporarily assembled with 3/32" and
1/8" clecos, ready for final drilling with a #21 drill bit for the beefy 5/32" solid
rivets that are used throughout most of the spar. Starting to think
seriously about how to incorporate leading edge fuel tanks between ribs 1 and 4. Check out the construction pages for more details. |
 |
PROJECT STATUS: January 2006 (137 hours)
Happy New Year! If you're a Sonex
wannabuild, I hope you made a determined New Year Resolution, and this is the year you
take your first steps on the journey! :-) I'm 138 hours into construction so far. The horizontal and vertical tail parts have been
assembled entirely with clecos, but are now in pieces again for deburring, smoothing and
corrosion-proofing, before being reassembled for good with rivets.
I've uploaded a lot more pictures into the construction area (accessed via the menu
in navigation pane on the left of the page), but haven't had time to add much
commentary to the newer ones as yet. Also added some recent life images, from around
the Christmas period. |
 |
PROJECT STATUS: December 2005 (109 hours)
|
Okay, well it's now a year since I began this website and embarked on my
mission to build a Sonex. As it turned out, I was wildly optimistic to think I could
have the airframe completed this year, not least because it took until October to get
the kit! So I'm basically behind one year, with the plan now being to get the airframe
built by the end of 2006. The biggest potential hiccup with this, is that
I may have to go and work in America for three months to half a year, probably
beginning in February. So my immediate plan is to try and complete the tail surfaces
before I go. I currently have the horizontal stabiliser and elevators
formed and drilled, and am working on getting the vertical stab and rudder to the
same stage, so I can take all the parts to be alodined at a local metal fab shop.
|
 |
PROJECT STATUS: October 2005 (53 hours)
|
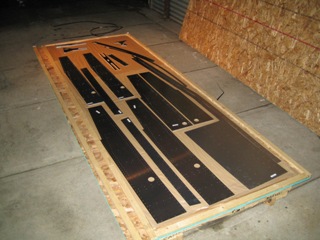
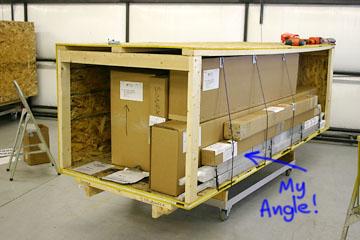
Yeah Baby! It's here! Whoo-hoo! Early this month I went out to the
freight depot and collected one very large wooden box and a long cardboard tube. The
cardboard tube was actually a bit damaged in the middle, but luckily the spar cap
extrusions inside were fine. At first the box appeared quite a bit larger than I had
been expecting, but after unpacking it and moving all the contents into a spare room in
my house, my perspective changed a little - it's hard to believe there actually enough
stuff there to build an entire airplane - or at least the airframe. It
really is an amazing kit. Virtually everything is here, right down to wheels
and brakes and even seatbelts. And nuts and bolts, counting the Wicks hardware kit.
I simply can't explain how much of an improvement this kit is, compared to what I
had previously been exposed to. The laser cut skins look fantastic, complete with
smooth curvy edges and thousands of pilot holes, all in perfect position! The wing
ribs are almost perfectly flat, the flanges perfectly formed. The flanged ends even
have pilot holes in them. I am so pleased I bought the full kit, I just can't
overstate it. You can see some of the laser-cut parts in the picture
on the right, laying in the pallet. There are actually eleven layers of these parts
in the pallet. I had to take them out layer by layer to get them inside, as I could
lift the pallet in through the doorway. I unpacked the contents of a
couple of the boxes which had more interesting inventory lists, and put the parts on
a shelf. I tell you, this is better than Christmas when you were a kid! :-)
Something I've changed my mind about though, is that I've gone from wanting
dual-stick controls to wanting a single stick setup. The Victa that I did some
aerobatic training in had a centre-stick and I liked it a lot. Plus the "sitting in
the middle" thing when flying solo has a lot of appeal. These thoughts have been
reinforced by the people I have spoken to with single stick Sonexes - they prefer
it. So I'm going buy the single stick welded parts and hardware and try to get them
sent to Australia inside someone else's crate. Anyone importing a Sonex kit??
The only frustration in all this, is that it looks like I am going to have to go and
work in the USA for half a year or so very shortly, and so I won't be able to make a
proper start on the construction until I return. Because of this I haven't unpacked
the kit as much as I otherwise would. What else is new? Hmm.. oh -
the new Dynon
EFIS-D100 looks like it's now shipping. When I pulled the instrument panel out
from the laser-parts, I was surprised how small it is! It looks to me like it's for
a single place aircraft! (Centre stick thoughts again...) I had
virtually made up my mind I would spend the extra money and get one of those snazzy
looking GRT EFIS Horizon 1 instruments,
but now the Dynon looks like a serious contender also. No doubt there will be even
more choice by the time I am ready to install something.
 |


|
PROJECT STATUS: September 2005
I am told my kit is due into Melbourne on the 29th. I'm guessing another
week or two to get it from there down here to Tassie. And I received a big bill for the
GST last week. So... not long now! PROJECT STATUS: August 2005
Finally got the money together to pay for the rest of the kit. Hopefully
it will ship out around the end of this week, and should arrive next month! Fingers
crossed! PROJECT STATUS: July 2005
(43 hours) Nearly 50 hours into construction now. I've made all the angle parts to
about 90% completion. I will wait until after I have fitted them to their associated
assemblies and drilled the pilot-holes to final size before getting too pedantic about
surface finish and alodining etc. See the
construction page for
pictures etc. I've added a 'files' section to the menu on the left, and
also a link to a report from the TimerTracker program I'm using to keep track of the
hours I spend on the project. I use this program for work, also... it's a really useful
little utility, but unfortunately is not the most stable program, and crashes annoyingly
often. I still like it though. PROJECT STATUS: June 2005
My angle stock subkit has finally arrived - whoo hoo! I've been modifying Terry Holek's (#590) excellent parts spreadsheet to better suit my project, and should soon be able to begin cutting the angle into the required lengths.
Building begins! Check out the first
construction page for more information. PROJECT STATUS: March 2005
There was a bit of a hiccup in the shipping of Mike's kit, and so my
angle stock isn't now due to arrive here until mid-April. So, not a lot actually
happening yet I'm afraid. Time to start thinking about placing an order with Wicks
Aircraft Supplies, to get some tools and the hardware I will need sent to Sonex-Ltd for
inclusion with my kit. It's a pity that Sonex-Ltd doesn't supply a
hardware kit of their own (as Mustang-Aero does), but I guess this is just the way it is
for now. PROJECT STATUS: February 2005
 Hm,
I think I was being somewhat optimistic about finishing the airframe this year, mainly
due to underestimating the length of time it would take to actually get started. So I'm
revising my resolution to one year from when the kit arrives... :-) Hm,
I think I was being somewhat optimistic about finishing the airframe this year, mainly
due to underestimating the length of time it would take to actually get started. So I'm
revising my resolution to one year from when the kit arrives... :-)
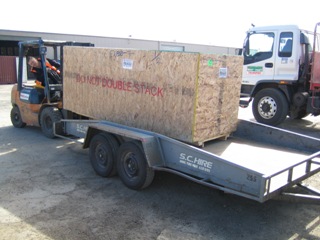
I've paid a 1/3 deposit on the full kit, which puts my name in the (12 week!) queue. The
estimated shipping date for my kit is May the 4th. I'm not sure how long it will then
take to get to Australia, but I'll soon find out because Mike Strudwick's kit #759 has
just left Sonex-Ltd, bound for Hobart!
My stowaway Aluminium angle bundle can be seen strapped on top of Mike's bundle in this
picture sent by Mark @ Sonex. So hopefully that should turn up fairly soon and I'll be
able to get started building some of the smaller parts.
This is great for me actually, since I will get to see a full kit first-hand before mine
is shipped. Once I've actually 'seen' what is in the kit, I'll better know what other
hardware etc. I want to purchase from Wicks etc. and have put in with my crate. I am
very grateful to both Mike & the people at Sonex, for being so accommodating.
 And...
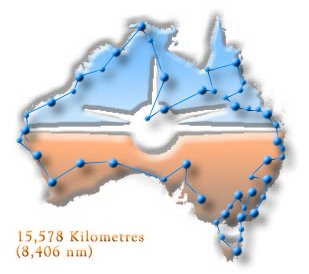
I have entered my (unfinished... actually un-started!) Sonex in the
Great Australian Air Race which is
being held in 2010, celebrating the centenary of powered flight in Australia. Well,
actually they're only accepting 'expressions of interest' at the moment, but since the
race is limited to 100 aircraft I wanted to make sure I don't miss out! Formal entries
and deposits are required next year. And...
I have entered my (unfinished... actually un-started!) Sonex in the
Great Australian Air Race which is
being held in 2010, celebrating the centenary of powered flight in Australia. Well,
actually they're only accepting 'expressions of interest' at the moment, but since the
race is limited to 100 aircraft I wanted to make sure I don't miss out! Formal entries
and deposits are required next year.
I hope the Sonex will be a great airplane to do this race with, as it is reasonably fast
and the operating costs are relatively low - makes a difference when the race is over
fifteen thousand kilometres long!
The Sonex is also slow enough that I hope to be able to admire more of the
scenery than I was able to while tearing along at 220kts in the NZ air-race last year.
Pictures of that race can be seen by going to the 'Life Gallery' menu on the left, or by
clicking here.
PROJECT STATUS: January 2005 (really, this time!)
Okay. It's nearing the end of January. That's 1/12 of the year gone!
How's my NYR going?
It seems it's going to take me at least another couple of months to
get the money together for the full kit, so in the meantime I have
bought the plans only (#776) to get a better understanding of the
project. There appear to be quite a few parts that must be
fabricated entirely by the builder from raw angle and flat stock.
The raw material for most of these parts is contained in the
Aluminium Angle & Flat Stock sub-kit, which is in turn part of the
easy-build
kit.
A builder in Hobart (about 2 hours drive from me) has a full kit on order,
due to ship out of the Sonex factory in just over a week, on Feb-2. The AA&FS that Sonex
supply is relatively cheap (~US$300), so I am trying to organise for
an extra AA&FS subkit to be packed into his shipping crate. If I can
swing it, that will give me some material to work with while I save
up for my own 'big box'!
Not being able to afford the whole thing right at this moment may be
a blessing in disguise, as it will hopefully allow time for me to
get a garage/workshop built, and I'll also be able to check out
Mike's full kit in the flesh before I completely commit to the same
thing myself. I also hope to get over to Adelaide and check out
Lynn
Jarvis' flying Sonex before I place the full order.
So. Looking at the plans, building a workshop and trying to get some
Aluminium! PROJECT STATUS: January 2005 (well, nearly!)
It's the last day of the year. I'm sitting in my tent at the
Marion Bay Falls Festival
at the moment. Walking along the beach yesterday, contemplating
life, I decided there should be no reason why I can't build a
complete Sonex airframe before the end of 2005, so long as I can
organise to buy the full kit very soon. I feel I have enough
experience from building the Mustang-II to jump straight into the
Sonex with a minimum of confused head scratching. If
I can build the airframe this year then I should be able to scrape
together enough money to buy an engine in 2006. Then I've got a few
years to save up to compete in the 2010
Great Australian Air-Race...
:-) So. New Year Resolution for 2005: Build a Sonex
this year. Anyway, some bands I like are going to be
playing soon, so it's time to head back out into the valley.
|